本文档介绍如何保存和读取Tensorflow变量和模型。
官方文档可参考:
保存/读取变量
本节介绍如何存取Tensorflow变量。注意Estimators会自动在model_dir中存取变量。
tf.train.Saver 提供了存取模型的接口,其构造函数会在图中增加存取模型的op。
示例化的Saver对象提供方法来运行这些op并,设置checkpoint文件用于保存和恢复模型信息。
Saver关于将模型中定义的所有变量保存,如果你不了解加载模型的graph结构,可以参考后面的保存恢复模型一节。
TensorFlow将变量以二进制形式存储在文件中,保存的信息主要是变量名以及对应的Tensor的值。
保存变量
调用tf.train.Saver()来管理模型变量,示例代码:
1 2 3 4 5 6 7 8 9 10 11 12 13 14 15 16 17 18 19 20 21 22 23 | |
恢复变量
同样使用tf.train.Saver来从checkpoint中恢复变量,示例代码:
1 2 3 4 5 6 7 8 9 10 11 12 13 14 15 16 17 18 | |
存取指定的变量
有时可能只需要存取模型graph中的部分变量,可以list或者dict两种形式传给tf.train.Saver()来指定需要存取的变量。
- list形式,模型的变量列表。
- dict形式,name为新的保存后的变量名,value为模型中的变量名。
示例代码:
1 2 3 4 5 6 7 8 9 10 11 12 13 14 15 16 | |
注意:
- 可以创建多个模型Saver对象来保存模型变量,同样的变量可被不同的Saver保存多次,restore操作用于从checkpoint中恢复变量的值。
- 如果checkpoint中只保存了部分变量,那么恢复后,graph中其他的变量仍需要被初始化。
- 查看checkpoint中的变量可以使用inspect_checkpoint库,特别是print_tensors_in_checkpoint_file函数。
- Saver默认使用tf.Variable.name属性作为每个变量的变量名,然而你可以在Saver对象中未变量指定存储在checkpoint中的新名字。
保存/读取模型概述
当你想要保存整个模型(变量、模型graph以及graph的meta信息)时,我们推荐使用SavedModel。
SavedModel是一种面向多语言的,可恢复的高度序列化封装的格式。
SavedModel运行上层系统或工具来生产、消费或者转换Tensorflow模型。
Tensorflow提供了多种机制来同SavedModel进行交互,包括tf.saved_model API, Estimator API 以及 CLI方式。
操作SavedModel API
本节聚焦在使用底层Tensorflow API时需要用到的保存或加载SavedModel的API。
构建SavedModel
我们提供了SavedModel builder的python实现。SavedModelBuilder提供保存MetaGraphDef结构的功能。
- MetaGraphDef是MetaGraph的proto buffer表达形式。
- MetaGraph是一个数据流图,以及相关的变量、资源和signatures。
- signature是一个graph的输入与输出的集合。
每个加入到 SavedModel中的MetaGraphDef需要以用户指定的tag标注。tag提供了区分特定MetaGraphDef的方法。通常这些tag会标注MetaGraphDef的功能以及一些可选的硬件相关的信息。
SavedModelBuilder的使用示例代码如下:
1 2 3 4 5 6 7 8 9 10 11 12 13 14 15 16 | |
加载SaveModel
调用python版本的SaveModel loader需要提供一下信息:
- 保存graph定义和变量的session。
- 用来标识MetaGraphDef的tag。
- SavedModel对应的目录位置。
示例代码如下:
1 2 3 4 5 | |
C++版本的SavedModel loader也提供从指定目录恢复模型的API,并支持指定SessionOptions和RunOptions参数。
同样需要指定taq参数,被加载的SavedModel被SavedModelBundle引用,包含了MetaGraphDef以及加载它的session信息。
示例代码:
1 2 3 4 5 | |
另外Tensorflow提供了一组MetaGraphDef和SignatureDef相关的常量供用户使用。
MetaGraphDef常量:
- python:https://github.com/tensorflow/tensorflow/blob/master/tensorflow/python/saved_model/tag_constants.py
- c++:https://github.com/tensorflow/tensorflow/blob/master/tensorflow/cc/saved_model/tag_constants.h
SignatureDef常量
- python:https://github.com/tensorflow/tensorflow/blob/master/tensorflow/python/saved_model/signature_constants.py
- c++:https://github.com/tensorflow/tensorflow/blob/master/tensorflow/cc/saved_model/signature_constants.h
在Estimators中使用SaveModel
当训练好Estimator模型后,你可能需要部署预测服务。你可以选择在本机启动一个本地服务,或在云端进行扩展。
部署Estimator训练出的模型需要先把模型导出为SaveModel格式,本节介绍:
- 如何制定输出节点以及相关的API
- 使用SavedModel导出模型
- 发请求给本地模型预测服务
准备Serving输入
训练过程中 input_fn()用于提供数据输入,类似地,预测阶段输入数据由 serving_input_receiver_fn提供。
serving_input_receiver_fn有如下两个功能:
- 将预测需要输入数据的placeholder添加到graph中。
- 添加额外的用于将输入数据格式转换为feature Tensors格式的op。
函数返回 tf.estimator.export.ServingInputReceiver对象,封装了placeholders以及feature Tensor。
当编写 serving_input_receiver_fn时,需要提供一个 tf.parse_example的特定parser描述来说明数据解析的方式。
Parser说明是一个dict的形式,包含:
- tf.FixedLenFeature
- tf.VarLenFeature
- tf.SparseFeature
示例代码:
1 2 3 4 5 6 7 8 9 10 11 | |
tf.estimator.export.build_parsing_serving_input_receiver_fn 工具函数给出了一个通用实现。
导出模型
调用 tf.estimator.Estimator.export_savedmodel ,提供导出路径以及serving_input_receiver_fn进行模型导出:
1
| |
该方法创建一个新的graph并调用serving_input_receiver_fn来获取输入tensor,随后调用Estimator的model_fn() 来产生模型的graph。
最终会创建一个带时间戳的目录(export_dir_base/
指定模型输出
通过export_outputs指定,其类型为 tf.estimator.EstimatorSpec,是一个形如 {name: output} 的dict,用于描述预测阶段的输出。
预测输出的值类型必须为 ExportOutput 的某个实现,例如:
- tf.estimator.export.ClassificationOutput,
- tf.estimator.export.RegressionOutput
- tf.estimator.export.PredictOutput.
部署本地预测服务
本地部署预测服务需要使用TensorFlow Serving。
TensorFlow Serving是一个独立的开源项目,功能是加载SavedModel模型并对外提供gRPC服务。
首先安装Tensorflow Serving。
部署服务命令如下,将 $export_dir_base 替换为SavedModel导出的目录。
1 2 | |
执行后在9000端口会启动一个gRPC预测服务。
向本地Server发送请求
发送预测请求需要通过PredictionService gRPC API。相关API依赖:
1 2 3 4 5 6 | |
python代码中可以像如下示例使用:
1 2 3 4 | |
请求的数据会以proto buffer的形式发送,发送请求的示例代码:
1 2 3 4 5 6 7 8 9 10 | |
本例中的返回值是一个 ClassificationResponse格式的PB数据。
SavedModel目录结构
Tensorflow为每个SavedModel组织目录结构形式如下:
1 2 3 4 5 6 | |
说明如下:
- assets:是一个子目录,包含了一些外部文件,例如词表等,这些资源文件会被特定的MetaGraphDef读取使用。
- assets.extra:是一个子目录,用于上层应用或者用户添加一些自己的资源文件,但不会被模型的graph加载。该目录不由SavedModel管理。
- variables:是一个子目录,用于存储tf.train.Saver的输出。
- saved_model.pb/saved_model.pbtxt SavedModel的Proto Buffer描述。包含了MetaGraphDef的proto buffer形式的定义。
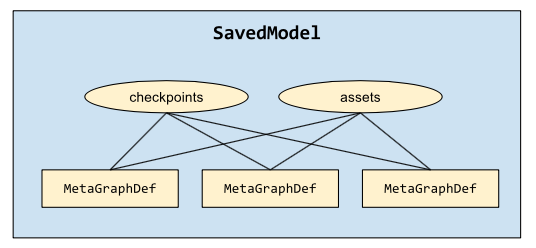
一个单独的SavedModel可以表达多个graph,SavedModel的多个graph共享一组checkpoint(变量和资源文件)。
组织形式如下图所示: